I immediately demanded that the entire structure come down. I couldn't bare the thought of a child getting buried under a massive pile of wood. Even more, the exhausted-mother-of-3 part of me felt a little empathetic toward the tired play-set. Like me, maybe it needed a vacation after years of standing as a fortress to so many kids. Our initial intention was to take it apart and make the necessary improvements and put it back together. I was standing in my daughter's second story room looking out the window as my husband disassembled the fort, when suddenly, I was struck with the idea to re-purpose the haggard old wood and transform it all into a traditional playhouse. I'm pretty sure my husband could see the giddiness in my expression, because it was that moment when he realized his weekends had become very busy. We began drawing up the plans that day.
-Before-
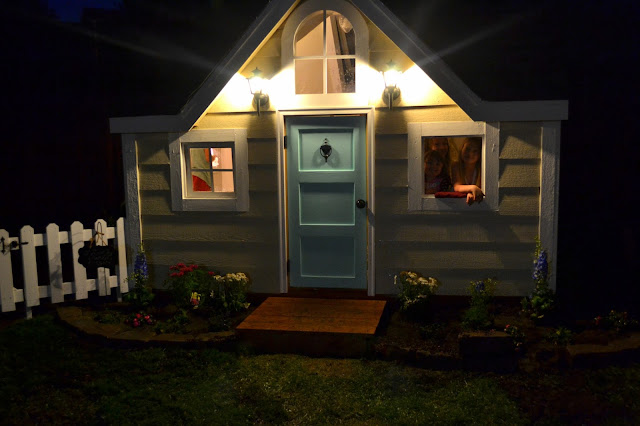
We did our best to repurpose as much of the old wood as possible. We used the rails of the existing fort to make the garden fence, and old lumber from the second floor to build the windows, trim, and casing. To do this, a lot of time was spent cutting each piece to size and sanding. The rest of the house was built using 2 x 4 construction on a pressure treated base, which was set on cinder blocks that were leveled into the ground. The house has a 3/4 inch sub-floor, OSV sheeting for the roof and 3D asphalt shingles. We recycled and restored a velux skylight to allow more natural light to shine in. All the windows and the door are handmade with standard 3 inch hinges, which were customized to use a ball catch. We have a GFI in our garage for the electrical, and then we used direct bury UF cable in a 12 inch trench to meet code. We used a 20 A circuit and 12-2 with ground to wire the inside. Thankfully we have a neighbor and good friend that is a professional electrition, and we was so kind in offering his help and knowledge. Don't you just love wonderful people? Because really, what's a house without light? For the interior we used 1/2 inch drywall and fiberglass insulation, and knock-down texture right out of the can. The kids were so helpful along the way, and Trenton was good to pass his carpentry knowledge on to them. I had fun searching thrift stores and garage sales for items to fix up and decorate with. This house truly was a labor of love- as friends stepped up and offered help, supplies, and even flowers to contribute to the garden. We made some new friends through the process, which is the ultimate perk of taking on a project like this. I hope we live here long enough for our grandbabies to play in it.
-After-
This miniature version of our home truly does set the sweetest backdrop for a fun childhood, and I feel warmth in my heart each time I see my babies playing in something we all worked so hard together to create.
Janet Schlosser- Forgetthefinishline.blogspot.com


Hi Janet! This is Hayley, your neighbor (with 3 little girls Ellie, Alyssa and Cece)! I just saw your blog on Facebook and wanted to say hello! We want to hang out with you guys more! Your dream playhouse is so amazing! And we love your kitchen too! You make me want to redo our kitchen! We so appreciate Trenton for helping us when Matt was gone and our basement was flooding!
ReplyDelete